Posts

MOSFET

Image
 MOSFET        Metal-Oxide-Semiconductor-Field-Effect-Transistor   is a type of field-effect transistor (FET) that acts as an electrical switch or amplifier to control the flow of electricity between drain to source and drain terminals.      MOSFET is a three terminal semiconductor device. Namely Gate, Drain and Source.    MOSFET Types MOSFET has the mainly two types 1.Enhancement mode 2.Depletion Mode E-MOSFET       E-MOSFET are commonly used to transistor that act like normally open switches, meaning they do not conduct when the gate voltage is zero. When a positive voltage is applied to the gate terminal, the channel conducts and drain current flows thorough it. Depletion mode-MOSFET     The depletion-mode MOSFET can operate in either enhancement or depletion mode. A positive Vgs will make the depletion mode NMOS work in the enhancement mode, while a negative Vgs will make it run in the depletion mode.      IN NEXT BLOG WORKING

Electronic oscillator division types and use

Image
Electronic oscillator division types and use Electronic oscillator division types and use Introduction to oscillator An oscillator is a amplifier and it is a close loop circuit or network. It uses the Positive feedback. It is not require the externel signel and generate the a desired frequency A oscillatpr acts like generator, It oscillates the constant amplitude and frequency. Oscillator can generate the frequency upto gigahertz. Classification of the Oscillators Oscillators are classified based on the type of waveforms generate from the oscillator, range, frequency, parameters used. Based on Output waveforms. Based on circuit components. Range of operating frequency. Based on feedback uses or not uses Types of oscillatprs LC Oscillator Har

Distence Measurment using Arduion

Image
Distence measurment using arduino How to make distence measurment using arduino Distence measurment using the arduino is easy just need to fallowing componets and connect the shown in the connection diagram Arduino Ultrasonic sensore 1 10k Potentiometer Bread Board Connecting wire LCD display Breaboard First take the breadboard and conect the wires as shown in the diagram connections connect the red and black wire for +5Vcc amd ground in arduino connect the display vss to ground and vdd to ground connecth the display V0 to center of the potentiometer display RS pin to arduino pin 2 Disply RW pin to Arduino ground Display E pin to Arduino pin 3 Display pin D4 to Arduino pin 4 Display pin D5 to Arduino pin 5 Display pin D6 to Arduino pin 6 Display pin D7 to Arduino pin 7 Displa

Friends Information

Image
Friends Information Friends Information Name: Email: Phone Number: Click here My instagram Please like and Share

Profile

Profile Click here Click to see or edit your profile page CONTACT Click here add or change your conatacts and links. favorate Click here check all your favorates

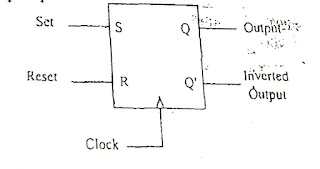
Clocked S-R Flip Flop

Image
Clocked S-R Flip Flop Clocked S-R Flip Flop a clocked S-R flip flop is designed by adding two AND gates to a basic NOR Gate flip flop.It is designed using four NAND gates. excitation table of S-R flip flop logic diagram of S-R fliop flop A clock pulse(CP) is given to the inputs of the AND Gate.When the value of the clock pulse is '0',the outputs of both the AND Gates remain'0'. As soon as a pulse is given the value of CP turns '1'. This makes the values at S and R to pass through the NOR gate flip flop. But when the values of both S and R values turn '1', The HIGH values of CP causes both of them to turn to '0' for a short moment. As soon as the pulse is removed, the flip flop state becomes intermediate. Thus either of the two states may be caused, and it depends on whether the set or reset input of the flip-flop remains a '1' l

How to download keil micro vision for 8051 in 2021

Image
How to download keil micro vision for 8051 How To Download keil Microvision 5 in windows 10 2021 Connect your intrnet to your laptop or desktop Open your favorate broweser and search for Keil microvision Click the first link In the next page click the download button In this page click on the Product downloads In this page there are 4 options in this clock C15 for 8051 microcontroller In this page click this C51V960A.EXE After clicking C51V960A.EXE this download will start Download select the loacation but don't change the name. Name will change errors will occur